
Recently, I stumbled across a stop-motion animation series on YouTube called "The Wind in the Willows", produced by Cosgrove Hall Films in the UK.
The Wind in the Willows (Full Movie)
The Wind in the Willows (Full Movie)


It’s a traditional British puppet show-style production, and everything from the script, direction, and puppet design to the voice acting and cinematography is done so well that it feels like a waste to leave it just for children. After discovering around 50+ episodes on YouTube, it’s become a perfect bedtime ritual for my wife and me. Even after watching the same episode multiple times, we never get tired of it.


The Wind in the Willows was one of Cosgrove Hall Films’ early major successes in stop motion. The 1983 film was adapted from Kenneth Grahame’s 1908 classic and won both a BAFTA and an Emmy. Its popularity led to a follow-up stop-motion series for Thames TV / ITV Network also by Cosgrove Hall. The voice cast featured (L to R) Peter Sallis as Ratty in TV series, Michael Hordern as Badger, David Jason as Toad, Richard Pearson as Mole, and Ian Carmichael as Ratty in the first film and narrator in TV series.

And perhaps best of all, watching this show finally helped me understand the meaning behind the "Toad Hall Racing Team" name that sometimes pops up in Western motorsports.


Like Toad himself, I’m completely enchanted by the joys of motoring.
It made me want a car that would let me and my wife relive the spirit of Toad’s adventures. Then I remembered that FLY once released two versions of a Lola with Toad Hall graphics printed on the body.

I vaguely remembered from racing it some 20 years ago that the FLY Classic Series sidewinder Lola T70, like the Ferrari 512S, had trickier handling than the Porsche 908s or 917s. So this time, I decided from the start to build the new Lola with a 3D-printed chassis.
Shapeways, which I had once relied on for 3D-printed parts, went bankrupt and later restarted under (I assume) new management. But it’s now a B2B-style 3D solutions consultancy, and honestly, I can’t figure out how to order products from them anymore.
So I went looking for a direct purchasing option and got in touch with Vasco Cunha of National Racers 3D (NR3D). I ended up buying a T70 chassis compatible with the Slot-it sidewinder motor pod—not the all-in-one type. There weren’t any in stock at the time, so I waited a bit until they were reproduced and shipped out.

With the stock full-depth cockpit that comes with the FLY body, there’s no room underneath for a Slot-it motor mount. Sure, I could cut down the stock cockpit and driver figure as usual to make a shallow upper-half version, but I was in the mood to take it easy.
I’d always been curious about the ThunderSlot T70 Cockpit Kit, so I decided to give it a try. I also ordered the Engine & Exhaust Kit from LEB Hobbies just in case, but I ended up not using it.
I already knew that gluing and truing FLY stock rubber tires on the plastic wheels with stock rear axle from FLY could give great grip. But since the stock tires get super gummy when hot, truing two sets would be a hassle. So I took the easy route this time as well.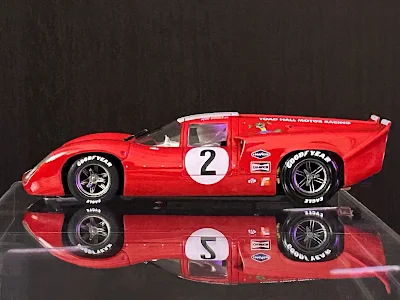
Older cars like the FLY-Classic series have very narrow wheel wells, so I need hubless aluminum wheels to make them fit. I ordered CB Design aluminum wheels, spyder inserts & 3-spoke knock-offs, and XPG urethane tires from Slot Car Corner.
For finishing the wheels, I didn’t go with metal primer and gun-metallic paint. Instead, I used a "Birchwood Casey Gun Blue Touch-Up Pen" from my airsoft hobby, which I started three years ago. Since it creates a black oxide layer on the aluminum surface through a chemical reaction, it’s more durable than paint, doesn’t affect the clearance for the inserts, and — best of all — gives authentic finish you'd see on a real gun's non polished metal.
The inserts, being resin, were just lightly sprayed with regular gun-metallic paint from a can.
After assembling all the chassis components, I installed the ThunderSlot cockpit kit into the body. I didn’t end up using the Engine & Exhaust Kit—instead, I slightly modified the original FLY parts and reused them. For the headlights and taillights, I added an LED kit from Z-Machine.
Finally, I finished it off with tire decals from Patto’s. I really love Patto’s decals—they’re thin yet tough, the ink is very opaque and durable, and they’re just excellent waterslide decals overall. I even bought a pair of Tamiya curved scissors just for cutting those arc-shaped tire decals. Compared to regular straight scissors, they make the job feel about 30% easier, at least to me.

Now I’m looking forward to running it again at my friend’s circuit in Osaka. “Poop-poop! Brum-brum-bruum!”
I’d always been curious about the ThunderSlot T70 Cockpit Kit, so I decided to give it a try. I also ordered the Engine & Exhaust Kit from LEB Hobbies just in case, but I ended up not using it.


Older cars like the FLY-Classic series have very narrow wheel wells, so I need hubless aluminum wheels to make them fit. I ordered CB Design aluminum wheels, spyder inserts & 3-spoke knock-offs, and XPG urethane tires from Slot Car Corner.

For finishing the wheels, I didn’t go with metal primer and gun-metallic paint. Instead, I used a "Birchwood Casey Gun Blue Touch-Up Pen" from my airsoft hobby, which I started three years ago. Since it creates a black oxide layer on the aluminum surface through a chemical reaction, it’s more durable than paint, doesn’t affect the clearance for the inserts, and — best of all — gives authentic finish you'd see on a real gun's non polished metal.

The inserts, being resin, were just lightly sprayed with regular gun-metallic paint from a can.

After assembling all the chassis components, I installed the ThunderSlot cockpit kit into the body. I didn’t end up using the Engine & Exhaust Kit—instead, I slightly modified the original FLY parts and reused them. For the headlights and taillights, I added an LED kit from Z-Machine.

Finally, I finished it off with tire decals from Patto’s. I really love Patto’s decals—they’re thin yet tough, the ink is very opaque and durable, and they’re just excellent waterslide decals overall. I even bought a pair of Tamiya curved scissors just for cutting those arc-shaped tire decals. Compared to regular straight scissors, they make the job feel about 30% easier, at least to me.

Now I’m looking forward to running it again at my friend’s circuit in Osaka. “Poop-poop! Brum-brum-bruum!”

0 件のコメント:
コメントを投稿