Not just for the DBR9, but Scalextric stock chassis in general tend to have their limits — once you swap in an aftermarket rear axle set, the gear mesh changes and produces harsh noise, or the motor mount cracks easily after a few removals due to low rigidity.
2025年10月10日金曜日
Scalextric Aston Martin DBR9 with Slotrax 3DP-Chassis
Not just for the DBR9, but Scalextric stock chassis in general tend to have their limits — once you swap in an aftermarket rear axle set, the gear mesh changes and produces harsh noise, or the motor mount cracks easily after a few removals due to low rigidity.
2025年10月9日木曜日
SCX Audi R8 LMP with Slotrax 3DP-Chassis
2025年7月31日木曜日
Patto’s Place; 1/32 NASCAR Truck Vac-Body Builds – 3 of 3 Pairs
#11 - Foster Love/Safelite Truck - Corey Heim - 2025
At first, I wasn’t quite sure how to handle these vac-formed bodies or the Peel & Stick reverse stickers. But as I got used to them, I began to figure out the techniques I needed—and before long, the process itself became something I genuinely enjoyed.
While building the original four trucks, I had full-race broadcasts of the NASCAR Camping World / Gander Outdoors Truck Series from around 2014–22, and the newer Craftsman Truck Series races from 2023 onward, running in the background on YouTube. Even though I only glanced up from time to time while working, it still meant I was passively absorbing more than a decade’s worth of liveries. Naturally, I ended up wanting to make two more trucks featuring the latest schemes.
It doesn’t really make sense, I know—there are only two of us who actually drive these cars, and under the skin, all six trucks are built to the same spec and perform exactly the same. But I still find myself wanting to add more, just because I love the look of the different liveries.
Even on Cup-style bodies, NASCAR schemes are designed purely to please the eye. I’ve always been drawn to the design side of things, and when it comes to trucks—especially ones I can’t easily find at a local hobby shop—they’re even harder to resist. They’re rare and unique, and that just makes me want to build more of them.
2025年7月29日火曜日
Patto’s Place; 1/32 NASCAR Truck Vac-Body Builds – 2 of 3 Pairs
#99 - Texaco Havoline Truck 5 - Ben Rhodes - 2019
As for the cockpit, the setup I had originally planned―using a 3D printed 1/32-scale interior―just looked a bit too petite to really fit into the generously-sized body of a NASCAR truck.
So I decided to take a shortcut and look for alternative pre-painted 1/32 Lightweight Cockpits to simplify the process. While searching on eBay, I came across a listing from the “Slot Car and Bicycle Emporium” eBay store for cockpits described as “beautifully handmade in Brazil.” They had caught my attention, so I figured I’d give them a try this time.
The downside was that the selection of painted racing driver variants was very limited, and there weren’t many options in the range, so I had to go with what was available.
2025年7月27日日曜日
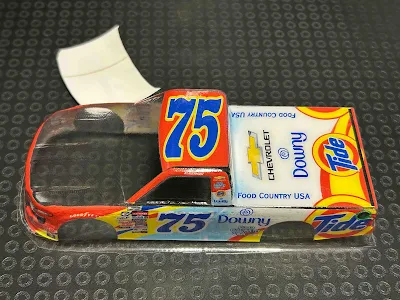
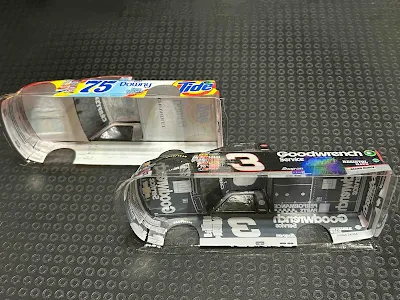
Patto’s Place; 1/32 NASCAR Truck Vac-Body Builds – 1 of 3 Pairs
#3 - Goodwrench Chevy Truck - Mike Skinner - 2016
Back when I was customizing a Scalextric Monte Carlo, I had quite a few conversations with Patto about NASCAR decals. Along the way, I found myself repeatedly browsing through the lineup of scratchbuilding resources Patto’s Place offers―and that’s when I discovered he actually had NASCAR trucks in the catalog.
It’s been 20 years since I first got into the slot car hobby in 2005, and still—not one single major brand has released a NASCAR truck.
Usually, the only option was for a few dedicated truck fans to build their own models from scratch, based on Monogram kits or small-run vac or resin bodies made by individual builders.
I actually did something similar myself about 14 years ago―using a different vac-formed body offered by Hot Laps Racin’, a.k.a. marair23 on eBay, to create a fantasy-liveried #42 Havoline Dodge.
https://nightbirdsfly.blogspot.com/2011/11/lexan-tinkering.html
Some optimists just took an easy shortcut―chopping off the rear cabin of a regular NASCAR Cup-style body and calling it a “pickup truck.” But that’s the absolute last thing I’d want to do. A slanted nose just doesn’t look like a pickup truck to my eyes―though maybe to an Aussie, it might pass as a “Ute."
Even among real-life trucks, I’ve never liked the era―roughly from the mid-’90s to mid-2000s―when slanted noses were the norm. I’ve always preferred the square-jawed, chunky, fist-like front end.
When the parcel from Patto arrived and I got my first look at the vac-formed clear PETG bodies, I honestly had no idea how to even approach them―I was totally at a loss. I quietly closed the box and left it untouched for a few months.
Later on, after working on the Monte Carlo and Lola T70 projects, I waited for that perfect moment when both my energy and motivation were peaking―then opened the box again.
Inside were four vac-formed bodies: two 2014–15 Chevy trucks and two 2014–15 Ford trucks. Determined not to let the momentum slip away, I started by cutting out the windows.
Big mistake.
The blade slipped mid-cut, and from that small overrun, a split quickly ran down the side of the thin shell―like tearing a sheet of paper.
Patto’s website mentioned the material as 0.5mm PETG,
but when I actually measured the body, it was only 0.1mm.
I emailed to complain, “This is way too thin!” and Patto replied, “Well yeah, it gets thinner when it stretches over the mold.” Fair enough―he had a point.
My fired-up motivation instantly froze over. I closed the box again. But I didn’t forget to order two truck bodies―one to replace the torn one, and one more for backup.
Despite the thinness, I had to admit―the body shape was great, and I was really impressed with the quality of the 'Peel & Stick Vinyl' reverse stickers. So even with the setback, a faint ember of motivation was still glowing. As soon as the replacements arrive, I plan to try again.
This time, I won’t cut out the windows. With a body thickness of just 0.1mm, it’s already fragile enough. Plus, when course marshals grab my car that’s off the track, they’ll likely grip it pretty firmly―and it could be crushed instantly. So instead of chasing realism, I’ve decided to prioritize structural integrity.
That means my re-start on this project will take the form of an R/C-style build: applying reverse decals to the inside of a clear body.
It’ll be my first time trying something like this.
Any gaps between the stickers can be filled in with flexible soft vinyl paint. Even just doing that gives the car a proper look. It’s great―it really keeps the motivation going.
Thanks to the printed decals, one of the trickiest parts of working with clear vac-formed bodies―the wheel arch cutouts―gets a lot easier.
No need to place the body over a rolling chassis, eyeball the tire positions with a marker, and sketch out a rough wheel arch freehand. Just cut along the printed decal lines.
That said, even with Tamiya’s curved scissors, it’s tough to get tight cuts on the arches. Those scissors are made for 1/10 scale curves, so for 1/32, it’s probably better to make rough cuts and refine the shape later with a Dremel sanding drum.
After sanding, the friction often leaves a rough edge along the arches—burrs in the PETG and torn bits of the sticker film. I gently swept both away with just the very tip of the knife, careful not to cut into the body.
Patto's vac body kits also come with a flat PETG sheet that’s meant to be folded into a rear spoiler, and a sticker meant to go on the inside of the fold.
I tried building it as intended, but since the rear spoiler is such a small piece, the PETG doesn’t stretch much during molding―it stays thick, reducing clarity, and the sticker print barely shows through. Stacking two of them just made it look awkwardly bulky.
So I ended up scratchbuilding my own from 1mm ABS sheet.
I also made six struts and mounted them behind the rear spoiler―probably the only real visual accent on these otherwise featureless NASCAR truck bodies.
I used the ever-reliable HRS-2 chassis in a rigid mount configuration. The wheels, tires, and inserts are the same setup as I used on the Monte Carlo. For 1/32 NASCAR builds, this size works best for me.
Not quite a full scratchbuild, but far beyond a simple kitbash―this build combines raw vac-formed bodies and 'Peel & Stick Vinyl' reverse stickers (both from Patto’s Place), along with added details and an HRS-2 chassis setup.
What started out as a daunting, unapproachable set of four vac bodies eventually turned into four finished cars—and even two extras beyond that. It genuinely eased the burden I’d been carrying all this time.
Whether that’s something to be glad about or not, I’m honestly not sure. Everyone sees life and death a little differently.
Still, everything that’s happened—or didn’t happen—during these dwindling days feels like a quiet blessing.
I once heard someone say, “Everything I came to know was worth knowing, and everything I never learned wasn’t necessary to know.
When the end of life still feels far away, it’s hard to see things that way. But when the heart truly arrives at that place, death no longer seems so frightening. And because so few days remain, I try to live each one with gratitude.


